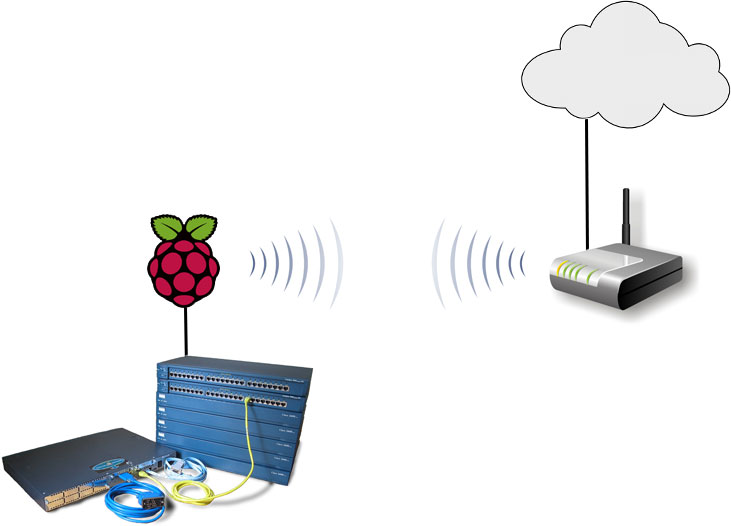
Raspberry Pis are small single-board computers which use Linux as their officially supported operating system. Because they're *nix systems and "I know this!," they can be used as low-power servers and even forward packets between their Ethernet and wireless interfaces. This makes them perfect for connecting a home lab to the internet using WiFi when running cable isn't possible. Using NAT and VNC, they can also be used to provide a lab internet access through a captive portal.
Raspbian Installation and setup
I recommend using Raspbian especially if you require using VNC but most Pi distributions should work as well. This guide uses Raspbian Jessie with Pixel. Since there are already plenty of installation guides on the internet, I wont go into the details here. However, a good place to start is the Raspberry Pi Foundation's image installation guide.
After installation, use the sudo raspi-config command to expand the filesystem and configure basic settings such as disabling the graphical desktop, changing the keyboard layout, and enabling SSH.
Wireless and IP configuration
To configure settings for connecting to a wireless network, you'll need to edit the /etc/wpa_supplicant/wpa_supplicant.conf file with your favorite text editor.
Open the configuration file using sudo nano /etc/wpa_supplicant/wpa_supplicant.conf
At the bottom of the file, add one of the following network entries
# For WPA and WPA2 networks
network={
    ssid="YourSSID"
    psk="YourPassword"
}
# For unsecured networks
network={
    ssid="YourSSID"
    key_mgmt=NONE
}
For more a more in depth guide on how to configure wireless, refer to the Raspberry Pi Foundation's Wireless CLI documentation.
Next, we'll set a static IP on the ethernet interface. You can do this by adding the following to the bottom of the /etc/dhcpcd.conf configuration file. Substitute your values as needed.
interface eth0
static ip_address=10.0.0.1/24
# Optionally configure DNS server settings
static domain_name_servers=8.8.8.8
static domain_search=your.suffix
Enable IP forwarding
To configure the Pi to route packets it receives on one interface and send it out another, IP forwarding will need to be enabled. Once again, you'll need to edit a config file. Using sudo nano /etc/sysctl.conf, uncomment the following line as shown below.
# Uncomment the next line to enable packet forwarding for IPv4
net.ipv4.ip_forward=1
NAT configuration
Using NAT eliminates the need to add a route on the next hop router which points back to network(s) behind the Pi. This guide shows the more universal solution of using a Many to 1 NAT but depending on what you are trying to do, you may opt to configure this differently.
Create a NAT rule using this iptables command. This rule NATs (technically using PAT) all traffic using the IP address on the wlan0 interface.
sudo iptables -t nat -A POSTROUTING -o wlan0 -j MASQUERADE
To make your iptables rules survive a reboot, you'll want to install the iptables-persistent using the following commands. During the installation, you'll be prompted to save your current rules.
sudo apt-get update
sudo apt-get install iptables-persistent
If you require VNC continue with the next steps, otherwise reboot your Pi with sudo reboot and go take a break before setting up the rest of your lab.
VNC (optional)
Using captive portals require users to logon or accept an agreement before they are allowed to access the internet. While I'm sure a way exists to accept an agreement or logon automatically, an easier solution would be to do it using the Pi's web browser. You can do this by connecting the Pi to a display or using VNC. In Raspbian Jessie the builtin RealVNC Server and Viewer makes setting this up easy.
The easiest way to enable to the VNC server is by running sudo raspi-config and selecting Advanced Options > VNC > Yes
Because you'll likely be running your Pi headless (without a graphical display) you'll want to start a virtual desktop. This is done by simply running the vncserver command in the console terminal. After that is done, you can connect to the Pi using a VNC Viewer such as RealVNC's VNC Viewer by connecting to the Pi's internal IP address appended by :1 in the connection settings.
Unfortunately however, the virtual desktop will not survive a reboot so you'll need to either issue the vncserver command to start it every time you turn on your Pi or add a custom system unit so it starts during bootup. To do this, we'll need to create a custom system unit file using:
sudo nano lib/systemd/system/vncserver-start-vdesk.service
Then add the following lines:
[Unit]
Description=Custom service which runs vncserver command to start a virtual desktop

[Service]
Type=oneshot
User=pi
ExecStart=/bin/sh -c "vncserver"
RemainAfterExit=yes

[Install]
WantedBy=multi-user.target
After saving the file, enable it with the following command then reboot the Pi with sudo reboot and test it out!
sudo systemctl enable vncserver-start-vdesk.service
Comments
comments powered by Disqus