I recently migrated to a new NAS for my home network and planned to add an extra 3TB drive to the RAID array. There was only one problem: the drive had some files on it from an old computer which I wasn't sure was backed up. I was anxious to get the RAID expansion started since I knew it would take a few days to complete, but installing the drive with the data on it would have wiped the disk. The obvious answer was to just temporarily move the files somewhere else and sort through them later. Sounds fine right? Yeah, it wasn't.
WARNING: Commands used in the post can and will cause permanent data loss. If you are following along, always back-up your data first, make sure you understand what each command does, and verify the command includes the correct unmounted disk before you run them. To help prevent mistakes, I've replaced the actual device file names in this post with /dev/sdX.
Mistakes were made
It's probably something we've all done without much thought or hesitation. I simply took the files off the 3TB drive and moved them onto an old used 1TB drive. Unfortunately, when I later reinserted the 1TB drive, the disk spun up, but the filesystem just wouldn't mount... Yup, I messed up.
The 3-2-1 rule
My primary mistake was violating the golden "3-2-1" backup rule. I should have maintained three copies of the data, on at least two different media, one of which should have been offsite. Instead I had only one copy of the data, on one medium, and zero offsite. In other words, I didn't backup the data at all.
For the record, my normal backup strategy does follow the 3-2-1 rule:
- The first copy of the data exists on the local machine
- The second copy is backed up daily by the machine to my local NAS
- The third copy (a copy of the backup) is synced offsite to a cloud storage
Unfortunately, during the NAS migration I didn't quite have enough capacity to store all the files, and I didn't have another spare disk large enough for all the data to be backed up. I could have made another copy in my cloud storage which would have at least given me 2-2-1, but it would have gone outside my normal backup workflow which ultimately encrypts the backup before it ends up on my cloud storage. It would have also taken quite a long time to upload. If anything, I figured data loss is rare. So I said nah, forget it. Put it on the spare!
Test drives
Jokes aside, my other mistake was that I didn't question whether the unused hard drive was actually healthy before I put data on it. I had to learn this lesson the hard way, but it lead me to develop the simple procedure below to test and wipe all of my remaining unused drives.
- Copy (yes, I learned my lesson) any data worth keeping to another drive
- Backup the copy onto yet another drive/location to maintain at least two copies on different media
- Run a quick check of the disk with
sudo smartctl --test=short /dev/sdX - Wipe the entire disk with
sudo shred --force --verbose /dev/sdX - Perform an extended test with
sudo smartctl --test=long /dev/sdX
I'll go into more detail on these commands in the next section when applying them to the problem drive, but ultimately, after over a day of wiping and testing all of my unused drives, I didn't find any failure indicators, or errors on any of my other drives.
I'm by no means an expert when it comes to storage media, but I felt satisfied enough that overwriting each disk with shred and subsequently reading every block with a long smartctl test would adequately test each drive and reallocate any bad sectors.
Recovery and Repair
With all of my other unused drives wiped and tested, it was time to focus my attention back on the problem drive and attempt to recover my data.
Initial diagnostics
When I first inserted the drive and noticed there was a problem, my operating system repeatedly and unsuccessfully attempted to mount the drive. To prevent this from happened, I first started by disabling the automount feature in Gnome with the following commands:
gsettings set org.gnome.desktop.media-handling automount false
gsettings set org.gnome.desktop.media-handling automount-open false
Next, I inserted the drive and powered it on. I then confirmed that it was still seen withfdisk -l.
$ sudo fdisk -l
...
Disk /dev/sdX: 931.5 GiB, 1000204886016 bytes, 1953525168 sectors
Disk model: WDC WD10EFRX-68J
Units: sectors of 1 * 512 = 512 bytes
Sector size (logical/physical): 512 bytes / 512 bytes
I/O size (minimum/optimal): 512 bytes / 512 bytes
Since the drive was still found in fdisk output, I took a look at the drive's S.M.A.R.T attributes using smartctl. This gave me an overall baseline of the drive's health before running any tests that could potentially cause further damage if there was a critical hardware problem.
$ sudo smartctl --all /dev/sdX
...
SMART Attributes Data Structure revision number: 16
Vendor Specific SMART Attributes with Thresholds:
ID# ATTRIBUTE_NAME          FLAG     VALUE WORST THRESH TYPE      UPDATED  WHEN_FAILED RAW_VALUE
  1 Raw_Read_Error_Rate     0x002f   200   200   051    Pre-fail  Always       -       169
  3 Spin_Up_Time            0x0027   136   134   021    Pre-fail  Always       -       4183
  4 Start_Stop_Count        0x0032   100   100   000    Old_age   Always       -       102
  5 Reallocated_Sector_Ct   0x0033   200   200   140    Pre-fail  Always       -       0
  7 Seek_Error_Rate         0x002e   200   200   000    Old_age   Always       -       0
  9 Power_On_Hours          0x0032   096   096   000    Old_age   Always       -       3533
 10 Spin_Retry_Count        0x0032   100   100   000    Old_age   Always       -       0
 11 Calibration_Retry_Count 0x0032   100   100   000    Old_age   Always       -       0
 12 Power_Cycle_Count       0x0032   100   100   000    Old_age   Always       -       102
192 Power-Off_Retract_Count 0x0032   200   200   000    Old_age   Always       -       100
193 Load_Cycle_Count        0x0032   200   200   000    Old_age   Always       -       1
194 Temperature_Celsius     0x0022   117   098   000    Old_age   Always       -       26
196 Reallocated_Event_Count 0x0032   200   200   000    Old_age   Always       -       0
197 Current_Pending_Sector  0x0032   200   200   000    Old_age   Always       -       6
198 Offline_Uncorrectable   0x0030   100   253   000    Old_age   Offline      -       0
199 UDMA_CRC_Error_Count    0x0032   200   200   000    Old_age   Always       -       1
200 Multi_Zone_Error_Rate   0x0008   100   253   000    Old_age   Offline      -       0

SMART Error Log Version: 1
No Errors Logged
...
SMART attributes are vendor specific, and can be difficult to evaluate without knowledge of how the vendor chose to utilize them. However, there are some common critical attributes worth paying attention to. Wikipedia has a great table of SMART attributes and their descriptions. Perhaps most notable are the attributes pertaining to reallocation. Modern hard drives can automatically detect bad sectors and remap data to extra sectors of the disk. This happens transparently when data is read and written to the disk.
In the example output for my problematic drive above, no errors were logged, and both the Reallocated_Event_Count and Reallocated_Sector_Ct values were 0. The Current_Pending_Sector value, however, was 6. The Wikipedia page on SMART mentioned earlier describes the Current_Pending_Sector as follows:
Count of "unstable" sectors (waiting to be remapped, because of unrecoverable read errors). If an unstable sector is subsequently read successfully, the sector is remapped and this value is decreased. Read errors on a sector will not remap the sector immediately (since the correct value cannot be read and so the value to remap is not known, and also it might become readable later); instead, the drive firmware remembers that the sector needs to be remapped, and will remap it the next time it's written...
What this essentially means is that there are bad sectors of the disk that the drive cannot currently read. Since the drive cannot read the data, it also can't move it to an extra sector of the disk. It's marked as pending reallocation until it either becomes readable or is overwritten by new data.
Making a disk image
Before doing anything else that might cause further damage if there was a physical problem with the drive, I first created an "offline" image of the disk using ddrescue so I'd at least have something to work with if the drive completely failed. The ddrescue command I used set the input to /dev/sdX, set the output to an image file, and created a log file that could be used to recheck any bad sectors and resume if interrupted.
$ sudo ddrescue /dev/sdX hdd-recovery.img hdd-recovery.log
GNU ddrescue 1.23
Press Ctrl-C to interrupt
     ipos:  498352 MB, non-trimmed:    65536 B,  current rate:       0 B/s
     opos:  498352 MB, non-scraped:        0 B,  average rate:  23980 kB/s
non-tried:  501852 MB,  bad-sector:        0 B,    error rate:    2520 B/s
  rescued:  498352 MB,   bad areas:        0,        run time:  6h 18m 11s
pct rescued:   49.82%, read errors:        1,  remaining time:      4h 26m
                              time since last successful read:         26s
Copying non-tried blocks... Pass 1 (forwards)
ddrescue: Input file disappeared: No such file or directory
Unfortunately, about half way through you can see that the disk disappeared and ddrescue exited. There was also only 1 read error, which suggested to me that it may have been encountered either right before or after the disk disappeared. I attempted to resume ddrescue by starting it again with the same command, but after about 30 seconds the drive disconnected and reattached itself.
I restarted ddrescue a few times and found that while the same error would eventually occur, progress was still being made. Once I saw that all blocks had been tried, I added the -d flag to do direct disk operations and bypass the kernel cache. I also added -r5 to retry failed blocks up to 5 times before exiting. I then got smart and ran it in a while loop so I wouldn't have to manually keep restarting it. Ultimately, 99.98% of the data was rescued with 117367 kB of bad-sectors.
$ while :; do sudo ddrescue -d -r5 /dev/sdX hdd-recovery.img hdd-recovery.log; sleep 30; done
...
GNU ddrescue 1.23
Press Ctrl-C to interrupt
Initial status (read from mapfile)
rescued: 1000 GB, tried: 117367 kB, bad-sector: 117367 kB, bad areas: 237

Current status
     ipos:  498352 MB, non-trimmed:        0 B,  current rate:       0 B/s
     opos:  498352 MB, non-scraped:        0 B,  average rate:       0 B/s
non-tried:        0 B,  bad-sector:  117367 kB,    error rate:      19 B/s
  rescued:    1000 GB,   bad areas:      237,        run time:         26s
pct rescued:   99.98%, read errors:        1,  remaining time:         n/a
                              time since last successful read:         n/a
Retrying bad sectors... Retry 1 (forwards)
ddrescue: Input file disappeared: No such file or directory
Running tests
Now that I knew I at least had an image to work with in case the drive completely failed while attempting tests or data recovery, I proceeded to run smartctl tests.
I first ran sudo smartctl --test=short /dev/sdX which took about 2 minutes to complete. To view the results, I used `smartctl --all' shown in part below.
$ sudo smartctl --all /dev/sdX
...
SMART Attributes Data Structure revision number: 16
Vendor Specific SMART Attributes with Thresholds:
ID# ATTRIBUTE_NAME          FLAG     VALUE WORST THRESH TYPE      UPDATED  WHEN_FAILED RAW_VALUE
  1 Raw_Read_Error_Rate     0x002f   200   200   051    Pre-fail  Always       -       1634
  3 Spin_Up_Time            0x0027   136   134   021    Pre-fail  Always       -       4175
  4 Start_Stop_Count        0x0032   100   100   000    Old_age   Always       -       105
  5 Reallocated_Sector_Ct   0x0033   200   200   140    Pre-fail  Always       -       0
  7 Seek_Error_Rate         0x002e   200   200   000    Old_age   Always       -       0
  9 Power_On_Hours          0x0032   096   096   000    Old_age   Always       -       3615
 10 Spin_Retry_Count        0x0032   100   100   000    Old_age   Always       -       0
 11 Calibration_Retry_Count 0x0032   100   100   000    Old_age   Always       -       0
 12 Power_Cycle_Count       0x0032   100   100   000    Old_age   Always       -       105
192 Power-Off_Retract_Count 0x0032   200   200   000    Old_age   Always       -       103
193 Load_Cycle_Count        0x0032   200   200   000    Old_age   Always       -       1
194 Temperature_Celsius     0x0022   122   098   000    Old_age   Always       -       21
196 Reallocated_Event_Count 0x0032   200   200   000    Old_age   Always       -       0
197 Current_Pending_Sector  0x0032   199   199   000    Old_age   Always       -       180
198 Offline_Uncorrectable   0x0030   100   253   000    Old_age   Offline      -       0
199 UDMA_CRC_Error_Count    0x0032   200   200   000    Old_age   Always       -       1
200 Multi_Zone_Error_Rate   0x0008   100   253   000    Old_age   Offline      -       0

SMART Error Log Version: 1
No Errors Logged

SMART Self-test log structure revision number 1
Num  Test_Description    Status                  Remaining  LifeTime(hours)  LBA_of_first_error
# 1  Short offline       Completed without error       00%      3615         -
...
You can see above that the self-test completed without error. Comparing the attributes table with what I recorded earlier before running ddrescue, you can also see that the Current_Pending_Sector increased from 6 to 180.
Next I ran an extended test with sudo smartctl --test=long /dev/sdX which failed within a few minutes. I repeated the test several times, and each time it failed with 90% remaining near the same logical block addresses (LBA).
$ sudo smartctl --all /dev/sdX
...
SMART Attributes Data Structure revision number: 16
Vendor Specific SMART Attributes with Thresholds:
ID# ATTRIBUTE_NAME          FLAG     VALUE WORST THRESH TYPE      UPDATED  WHEN_FAILED RAW_VALUE
  1 Raw_Read_Error_Rate     0x002f   200   200   051    Pre-fail  Always       -       1634
  3 Spin_Up_Time            0x0027   136   134   021    Pre-fail  Always       -       4175
  4 Start_Stop_Count        0x0032   100   100   000    Old_age   Always       -       105
  5 Reallocated_Sector_Ct   0x0033   200   200   140    Pre-fail  Always       -       0
  7 Seek_Error_Rate         0x002e   200   200   000    Old_age   Always       -       0
  9 Power_On_Hours          0x0032   096   096   000    Old_age   Always       -       3616
 10 Spin_Retry_Count        0x0032   100   100   000    Old_age   Always       -       0
 11 Calibration_Retry_Count 0x0032   100   100   000    Old_age   Always       -       0
 12 Power_Cycle_Count       0x0032   100   100   000    Old_age   Always       -       105
192 Power-Off_Retract_Count 0x0032   200   200   000    Old_age   Always       -       103
193 Load_Cycle_Count        0x0032   200   200   000    Old_age   Always       -       1
194 Temperature_Celsius     0x0022   112   098   000    Old_age   Always       -       31
196 Reallocated_Event_Count 0x0032   200   200   000    Old_age   Always       -       0
197 Current_Pending_Sector  0x0032   199   199   000    Old_age   Always       -       180
198 Offline_Uncorrectable   0x0030   100   253   000    Old_age   Offline      -       0
199 UDMA_CRC_Error_Count    0x0032   200   200   000    Old_age   Always       -       1
200 Multi_Zone_Error_Rate   0x0008   100   253   000    Old_age   Offline      -       0

SMART Error Log Version: 1
No Errors Logged

SMART Self-test log structure revision number 1
Num  Test_Description    Status                  Remaining  LifeTime(hours)  LBA_of_first_error
# 1  Extended offline    Completed: read failure       90%      3616         973345254
# 2  Extended offline    Completed: read failure       90%      3616         973345253
# 3  Extended offline    Completed: read failure       90%      3616         973345253
# 4  Extended offline    Completed: read failure       90%      3615         973345264
# 5  Extended offline    Completed: read failure       90%      3615         973345264
# 6  Short offline       Completed without error       00%      3615         -
...
Recovering the data
At this point, I was convinced the drive was dying and would need to be retired so I turned my attention to recovering my lost data. To do so, I used TestDisk, an interactive command line utility designed to recover lost disk partitions and fix boot sectors. While it's really intended for repairing problems that are "software" in nature, it has the ability to list and copy files from deleted partitions while retaining filenames and the directory structure.
Because it's an interactive CLI tool, it's difficult to show you TestDisk examples concisely in this post. If you're interested, I'd recommend reading through the data recovery example on the TestDisk wiki for a more complete walk-through of TestDisk's menus.
After starting TestDisk and selecting the problematic drive, I first noticed it was not able to detect a partition table, and highlighted "None" as the detected partition table type. I initially suspected that the partition table may have been corrupted, and perhaps that was part of the problem. However, I then remembered that I hadn't actually created a partition table on this disk so I continued with "None" as the partition type. I navigated to "Advanced", then "list files". To my surprise, it displayed all of the directories I had created on the disk. Selecting each top level directory individually, I copied each of them off to a safe location one-by-one.
Copying the directories took a few hours to finish, but I was able to recover most of my data. I didn't see any failures at all except while copying the last two directories that were listed. It also didn't disconnect at any point while reading the disk like it had frequently when running 'ddrescue' earlier.
TestDisk 7.0, Data Recovery Utility, April 2015
Christophe GRENIER <grenier@cgsecurity.org>
http://www.cgsecurity.org
   P ext4                     0   0  1 121601  80 63 1953525168 [backup]
Directory /
Copy done! 80366 ok, 1290 failed
 drwx------  1000  1000      4096  3-Jan-2022 13:50 .
 drwx------  1000  1000      4096  3-Jan-2022 13:50 ..
...

TestDisk 7.0, Data Recovery Utility, April 2015
Christophe GRENIER <grenier@cgsecurity.org>
http://www.cgsecurity.org
   P ext4                     0   0  1 121601  80 63 1953525168 [backup]
Directory /
Copy done! 144 ok, 809 failed
 drwx------  1000  1000      4096  3-Jan-2022 13:50 .
 drwx------  1000  1000      4096  3-Jan-2022 13:50 ..
...
Since TestDisk wasn't able to copy all of the files in the last two directories, I thought I'd give PhotoRec a try next. PhotoRec is a tool maintained by the same developer as TestDisk and is included with TestDisk when installed via apt in Debian. Unlike TestDisk, "PhotoRec ignores the filesystem and goes after the underlying data..." This made it the logical choice after trying TestDisk. Unfortunately, it also meant that I couldn't search only files within certain directories and filenames would be lost. Instead, it would read the disk and attempt to recover files by identifying known file headers and parsing the actual data. For more information, check out the official Wiki section, How PhotoRec works.
Since I knew the files in the two directories were HTML and PCAP files from a security competition I participated in many years ago, I set the file options in PhotoRec to only look for Text (including HTML) and PCAP files before I started it. Unfortunately, while it did recover around 262,000 files, nearly all of them were system text files that I wasn't interested in. I also knew the PCAP files I had saved were all 500MB files. PhotoRec correctly identified the files as PCAPs, but it seemed to have trouble finding the start and end of the files. As you can see below, it recovered files of varying sizes with the largest being massive at 476G. When I attempted to open them, they unfortunately all opened with errors.
$ sudo find ./recup* -type f -name '*.pcap' -exec mv '{}' pcap/ \;
 $ ls -lahS pcap/
total 663G
-rw-r--r-- 1 root  root  474G Jan 26 09:31 f959545344.pcap
-rw-r--r-- 1 root  root  170G Jan 26 07:42 f277119472.pcap
-rw-r--r-- 1 root  root   16G Jan 26 07:53 f656572416.pcap
-rw-r--r-- 1 root  root  1.7G Jan 26 07:59 f756400128.pcap
-rw-r--r-- 1 root  root  1.4G Jan 26 07:57 f725974432.pcap
-rw-r--r-- 1 root  root  621M Jan 26 07:57 f728825856.pcap
-rw-r--r-- 1 root  root   61M Jan 26 07:53 f692334936.pcap
-rw-r--r-- 1 root  root   53M Jan 26 07:53 f688140208.pcap
-rw-r--r-- 1 root  root   26M Jan 26 07:56 f725922464.pcap
-rw-r--r-- 1 root  root   15M Jan 26 07:56 f725893368.pcap
-rw-r--r-- 1 root  root  324K Jan 26 07:16 f277118824.pcap
-rw-r--r-- 1 root  root  220K Jan 26 07:53 f688139768.pcap
-rw-r--r-- 1 root  root  220K Jan 26 07:53 f692334496.pcap
-rw-r--r-- 1 root  root   28K Jan 26 07:56 f725974376.pcap
drwxrwxrwx 4 brian brian  20K Jan 26 10:25 ..
drwxr-xr-x 2 root  root  4.0K Jan 26 10:21 .
Although I was a bit disappointed that I couldn't recover all of my data, the data in these last two directories wasn't critical. All of the files I really cared about was already recovered successfully. I decided to move on, and see if anything could be done to repair the filesystem.
Repairing the filesystem
Now that the crisis had been averted and all of the files I cared about had been recovered, I wanted to see whether I could determine why the drive wouldn't mount, and hopefully correct the problem. It seemed like a good learning opportunity so I pressed on and kept digging.
To get started, I first attempted to mount the drive with verbose output and checked 'dmesg' when it failed to mount.
sudo mount --verbose /dev/sdX /mnt
mount: /mnt: can't read superblock on /dev/sdX.
$ sudo dmesg
...
[620826.528616] usb 2-2: USB disconnect, device number 111
[620826.544590] print_req_error: I/O error, dev sdX, sector 973345216
[620826.544599] JBD2: Failed to read block at offset 568
[620826.544605] JBD2: recovery failed
[620826.544606] EXT4-fs (sdX): error loading journal
[620826.928683] usb 2-2: new SuperSpeed Gen 1 USB device number 112 using xhci_hcd
[620826.949344] usb 2-2: New USB device found, idVendor=2537, idProduct=1066, bcdDevice= 1.00
[620826.949349] usb 2-2: New USB device strings: Mfr=1, Product=2, SerialNumber=3
[620826.949352] usb 2-2: Product: NS1066
[620826.949354] usb 2-2: Manufacturer: Norelsys
[620826.949357] usb 2-2: SerialNumber: 0123456789ABCDE
[620826.951262] usb-storage 2-2:1.0: USB Mass Storage device detected
[620826.951550] scsi host1: usb-storage 2-2:1.0
[620829.494840] scsi 1:0:0:0: Direct-Access     ATA      WDC WD10EFRX-68J 1A01 PQ: 0 ANSI: 6
From the output above, you can see that mounting the drive failed because the superblock could not be read. In the dmesg log you can also see that an I/O error was logged, JBD2 failed to read a block at a given offset, and EXT4-fs consequently reported an error loading the journal. Given these messages, and the fact that I was able to copy most of the files off the disk using TestDisk, it seemed likely that there was a problem preventing the superblock and/or journal from being read when the filesystem was mounted.
Here are brief explanations for these concepts:
- The superblock is an intial block of data in an ext filesystem that holds information about the filesystem itself. It contains information such as block counts, inode counts, flags, and enabled features. It's critical to the operation of the filesystem and for that reason is backed up at different locations on the disk.
- The journal is a small region of the disk that helps protect the filesystem from unexpected crashes or power loss. It does this by providing a temporary location so that important writes can be quickly written to disk, while also recording the transaction in a "journal". The transaction is later replayed from the journal to move the data to a final location on disk. I should note that the journal also has it's own superblock as well.
For more on the superblock, the journal, and ext4 in general, I recommend reading through the Ext4 Disk Layout Wiki page.
To test whether the superblock was readable and check for and errors, I used dumpe2fs which displays the contents of ext4 superblocks. The command outputs quite a bit of data, so I've filtered it for brevity.
$ sudo dumpe2fs /dev/sdX | grep -i "error\|superblock"
dumpe2fs 1.44.5 (15-Dec-2018)
Filesystem state:         clean with errors
Errors behavior:          Continue
FS Error count:           523
First error time:         Mon Jan  3 10:43:30 2022
First error function:     ext4_validate_block_bitmap
First error line #:       384
First error inode #:      0
First error block #:      0
Last error time:          Mon Jan  3 15:42:22 2022
Last error function:      ext4_validate_block_bitmap
Last error line #:        384
Last error inode #:       0
Last error block #:       0
  Primary superblock at 0, Group descriptors at 1-117
  Backup superblock at 32768, Group descriptors at 32769-32885
  Backup superblock at 98304, Group descriptors at 98305-98421
  Backup superblock at 163840, Group descriptors at 163841-163957
  Backup superblock at 229376, Group descriptors at 229377-229493
  Backup superblock at 294912, Group descriptors at 294913-295029
  Backup superblock at 819200, Group descriptors at 819201-819317
  Backup superblock at 884736, Group descriptors at 884737-884853
  Backup superblock at 1605632, Group descriptors at 1605633-1605749
  Backup superblock at 2654208, Group descriptors at 2654209-2654325
  Backup superblock at 4096000, Group descriptors at 4096001-4096117
  Backup superblock at 7962624, Group descriptors at 7962625-7962741
  Backup superblock at 11239424, Group descriptors at 11239425-11239541
  Backup superblock at 20480000, Group descriptors at 20480001-20480117
  Backup superblock at 23887872, Group descriptors at 23887873-23887989
  Backup superblock at 71663616, Group descriptors at 71663617-71663733
  Backup superblock at 78675968, Group descriptors at 78675969-78676085
  Backup superblock at 102400000, Group descriptors at 102400001-102400117
  Backup superblock at 214990848, Group descriptors at 214990849-214990965
dumpe2fs: Block bitmap checksum does not match bitmap while trying to read '/dev/sdX' bitmaps
The superblock seemed to be read by dumpe2fs just fine, but it indicated there was a problem with the block bitmap checksum. While this didn't necessarily point to a problem with the superblock itself, I decided to try using e2fsck to repair the filesystem using a backup superblock. Unfortunately, an I/O error was encountered and the drive immediately disconnected again and reconnected as a new device file name,/dev/sdY, before e2fsck could continue.
$ sudo e2fsck -b 229376 -B 4096 /dev/sdX
e2fsck 1.44.5 (15-Dec-2018)
Superblock needs_recovery flag is clear, but journal has data.
Recovery flag not set in backup superblock, so running journal anyway.
backup: recovering journal
Error reading block 121668196 (Input/output error).  Ignore error<y>? yes
Force rewrite<y>? no
Error reading block 121667585 (Input/output error).  Ignore error<y>? yes
Force rewrite<y>? no
JBD2: recovery pass 1 ended at transaction 1478, expected 1506
e2fsck: No such file or directory while trying to re-open backup

backup: ********** WARNING: Filesystem still has errors **********
In the fsck output, however, I noticed that it attempted to replay and recover the journal shortly before the I/O error was encountered. I wanted to see if mounting the filesystem as read-only, without replaying the journal would work. To my surprise, it mounted successfully!
$ sudo mount -o ro,noload --verbose /dev/sdX /mnt
mount: /dev/sdX mounted on /mnt.
I then tried to copy off the remaining two directories that TestDisk reported failures with. I was shocked to find that most of the files missed by TestDisk copied without issue. There were now only a few files lost that I couldn't recover!
Considering that the drive mounted just fine without reading the journal, I decided to try disabling the journal entirely, before running e2fsck again to attempt a repair of the filesystem. Unfortunately, I continued to hit I/O errors that caused the drive to disconnect before it could be changed.
sudo tune2fs -f -f -O ^has_journal /dev/sdX
tune2fs 1.44.5 (15-Dec-2018)
Recovering journal.
/dev/sdX: Input/output error while reading block 121668196
JBD2: Failed to read block at offset 612
tune2fs: No such device or address while recovering journal.
At this point, I called it quits. There didn't seem to be much more I could do to overcome the unreadable blocks and I/O errors I kept encountering. Outside of a handful of unimportant files, I had also now recovered nearly all of the data.
Retiring the drive
The last step before retiring the drive and recycling it, was making sure all the data was securely erased first. While I wasn't storing sensitive customer data or anything like that on the drive, there's still potential that credentials and other sensitive information could still be recoverable with the right tools. It's also just a best practice that many businesses must follow for security and compliance reasons.
Wiping the data
Since most of us don't just have a degausser in their office, I used shred with 10 passes to overwrite all the data on the disk. Unsurprisingly, an I/O error was eventually encountered during the first pass and the drive promptly disconnected. I restarted it a few times to see if the first pass would ever finish, but it didn't.
$ shred -vfz -n 10 /dev/sdX
...
shred: /dev/sdf: error writing at offset 498693956096: Input/output error
shred: /dev/sdf: error writing at offset 498693956608: Input/output error
shred: /dev/sdf: error writing at offset 498693957120: Input/output error
shred: /dev/sdf: error writing at offset 498693957632: Input/output error
shred: /dev/sdf: error writing at offset 498693958144: Input/output error
shred: /dev/sdf: error writing at offset 498693958656: Input/output error
shred: /dev/sdf: error writing at offset 498693959168: Input/output error
shred: /dev/sdf: error writing at offset 498693959680: Input/output error
shred: /dev/sdf: error writing at offset 498693960192: Input/output error
...
Reviewing SMART attributes
Since I knew I'd be overwriting all of the data on the disk, I thought it'd be interesting to do a comparison of the SMART attributes immediately before and after using the shred command.
Before shred:
ID# ATTRIBUTE_NAME          FLAG     VALUE WORST THRESH TYPE      UPDATED  WHEN_FAILED RAW_VALUE
  1 Raw_Read_Error_Rate     0x002f   200   200   051    Pre-fail  Always       -       1738
  3 Spin_Up_Time            0x0027   136   134   021    Pre-fail  Always       -       4166
  4 Start_Stop_Count        0x0032   100   100   000    Old_age   Always       -       107
  5 Reallocated_Sector_Ct   0x0033   200   200   140    Pre-fail  Always       -       0
  7 Seek_Error_Rate         0x002e   200   200   000    Old_age   Always       -       0
  9 Power_On_Hours          0x0032   095   095   000    Old_age   Always       -       3690
 10 Spin_Retry_Count        0x0032   100   100   000    Old_age   Always       -       0
 11 Calibration_Retry_Count 0x0032   100   100   000    Old_age   Always       -       0
 12 Power_Cycle_Count       0x0032   100   100   000    Old_age   Always       -       107
192 Power-Off_Retract_Count 0x0032   200   200   000    Old_age   Always       -       105
193 Load_Cycle_Count        0x0032   200   200   000    Old_age   Always       -       1
194 Temperature_Celsius     0x0022   108   098   000    Old_age   Always       -       35
196 Reallocated_Event_Count 0x0032   200   200   000    Old_age   Always       -       0
197 Current_Pending_Sector  0x0032   199   199   000    Old_age   Always       -       184
198 Offline_Uncorrectable   0x0030   100   253   000    Old_age   Offline      -       0
199 UDMA_CRC_Error_Count    0x0032   200   200   000    Old_age   Always       -       1
200 Multi_Zone_Error_Rate   0x0008   100   253   000    Old_age   Offline      -       0
After shred:
ID# ATTRIBUTE_NAME          FLAG     VALUE WORST THRESH TYPE      UPDATED  WHEN_FAILED RAW_VALUE
  1 Raw_Read_Error_Rate     0x002f   200   200   051    Pre-fail  Always       -       1738
  3 Spin_Up_Time            0x0027   136   134   021    Pre-fail  Always       -       4166
  4 Start_Stop_Count        0x0032   100   100   000    Old_age   Always       -       107
  5 Reallocated_Sector_Ct   0x0033   200   200   140    Pre-fail  Always       -       0
  7 Seek_Error_Rate         0x002e   200   200   000    Old_age   Always       -       0
  9 Power_On_Hours          0x0032   095   095   000    Old_age   Always       -       3694
 10 Spin_Retry_Count        0x0032   100   100   000    Old_age   Always       -       0
 11 Calibration_Retry_Count 0x0032   100   100   000    Old_age   Always       -       0
 12 Power_Cycle_Count       0x0032   100   100   000    Old_age   Always       -       107
192 Power-Off_Retract_Count 0x0032   200   200   000    Old_age   Always       -       105
193 Load_Cycle_Count        0x0032   200   200   000    Old_age   Always       -       1
194 Temperature_Celsius     0x0022   104   098   000    Old_age   Always       -       39
196 Reallocated_Event_Count 0x0032   200   200   000    Old_age   Always       -       0
197 Current_Pending_Sector  0x0032   199   199   000    Old_age   Always       -       173
198 Offline_Uncorrectable   0x0030   100   253   000    Old_age   Offline      -       0
199 UDMA_CRC_Error_Count    0x0032   200   200   000    Old_age   Always       -       1
200 Multi_Zone_Error_Rate   0x0008   100   253   000    Old_age   Offline      -       0
As expected, the Current_Pending_Sector value dropped from 184 to 173. That's because the drive firmware was essentially waiting for the data in these 184 unreadable sectors to become known so they could be remapped. When the data saved on these bad sectors was overwritten by the shred command, the data was now known and and was transparently reallocated to extra sectors of the disk. Had shred actually been able to finish overwriting the entire disk, I expect that the Current_Pending_Sector count might have reached 0.
All of the other notable SMART attributes, including the Reallocated_Event_Count which I expected to increase, remained unchanged.
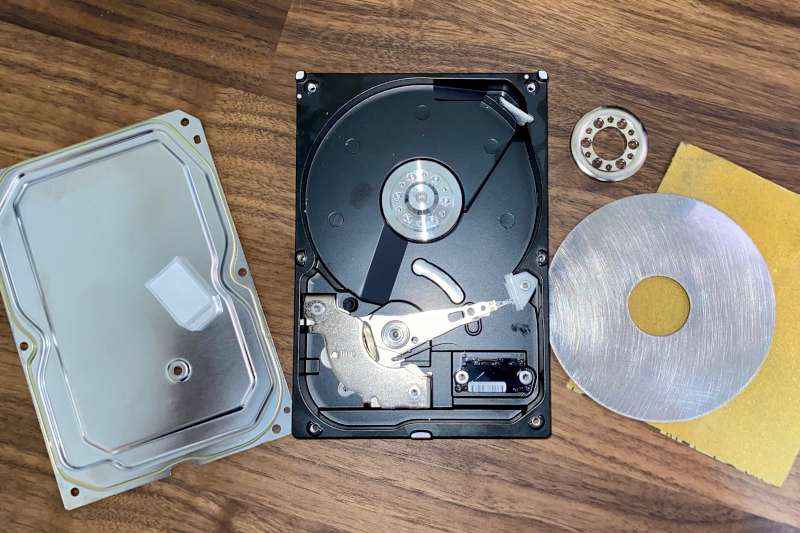
Going full red shirt
At this point, there was really only one thing that could be done. The only way to be sure that the disk couldn't be read after being sent for recycling was to imitate red shirt Jeff and physically destroy the drive. I put on my red shirt and protective gear, and began disassembling the drive. Merely taking the drive apart and exposing the platter to airborne dust particles might have been enough to make the drive unreadable. However, just to be certain, I removed the platter and used some sand paper to destroy the surface along with any data on it. While not quite as dramatic as using a Ramset hammer, it was a quiet and dignified ending.
References
- S.M.A.R.T. on Wikipedia
- TestDisk & PhotoRec Wiki
- Ext4 filesystem Wiki
- Debian Buster ddrescue man page
- Debian Buster smartctl man page
- Debian Buster testdisk man page
- Debian Buster photorec man page
- Data Recovery Tutorial - Getting started with DDRescue and TestDisk
- My Hard Drive Is Failing! - The smartctl Command & ddrescue Recovery Attempt
Comments
comments powered by Disqus